Showing posts with label EN. Show all posts

Friday, September 27, 2019

How to change Facebook page's name


In today's world, having a Facebook’s page may be very essential in your marketing strategy to promote your brand, product or blog and will definitely help you to get more followers on social media.

Having a good Facebook page’s name will help you to get in touch with people who already know or people who don’t know about your product.

In this blog we are going to see how we can change a Facebook page’s name on desktop in very easy and simple steps.

In order to change your Facebook page’s name, please follow the next five steps:

1 Log in to your Facebook’s account and go to your Facebook page.

2 Now you are on your Facebook page’s dashboard select the button “See more” from the list of the left side of the screen

3 Now whole list has shown up, click on the button “About”


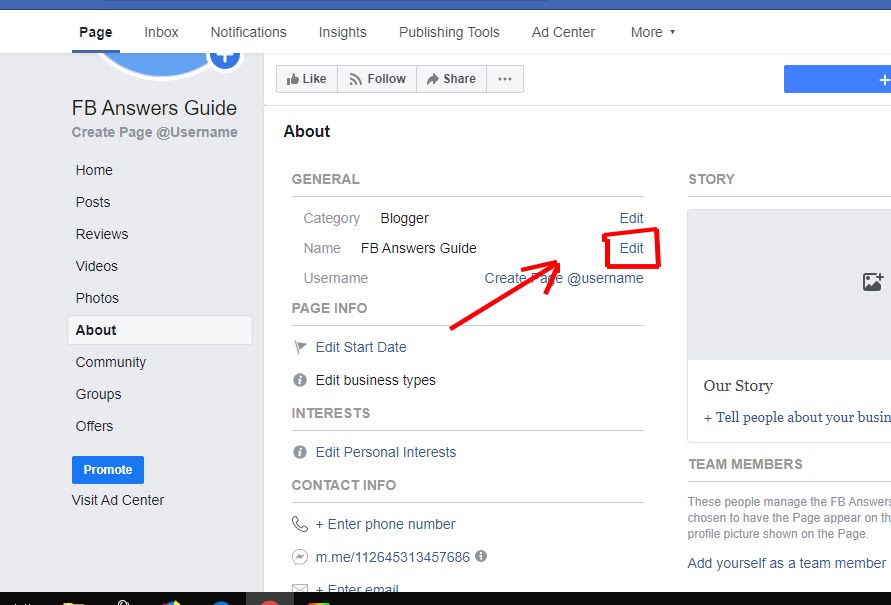
4 In the menu “General” and under “Category” click on the button “Edit” next to the “Name” section.

5 Now a new window page will show up, under the “Current Page name” click on “New Page name” in order to give your Facebook’s page a new name which helps to promote your business. In order to avoid problems, don’t use names of businesses or people who you don’t represent and make sure that your Facebook’s page name is authentic. In addition don’t use offending names because Facebook will not accept violating names. Finally you should not use the words “Facebook” or “official” in your new Facebook page’s name.


Your Facebook’s page name shouldn’t exceed 75 characters. Once you finish selecting the best name for your Facebook page, click on continue.

I hope this post has helped you to change your Facebook’s page on desktop.

Sunday, September 22, 2013

How to remove a Facebook page permanently

Deleting a Facebook page is permanent, once a Facebook page is deleted you will not be able to get it back whatsoever, so if you want to unpublish your Facebook page instead and make it invisible to the public click here. If you don't want to use your Facebook page anymore and have decided to delete it permanently. Here's a step by step guide to do delete a Facebook page below:

How to remove a Facebook page permanently:

1 First go to your Facebook page Admin Panel and click on Edit Page, then on Edit Settings as you can see in the picture.

Edit Facebook page settings.

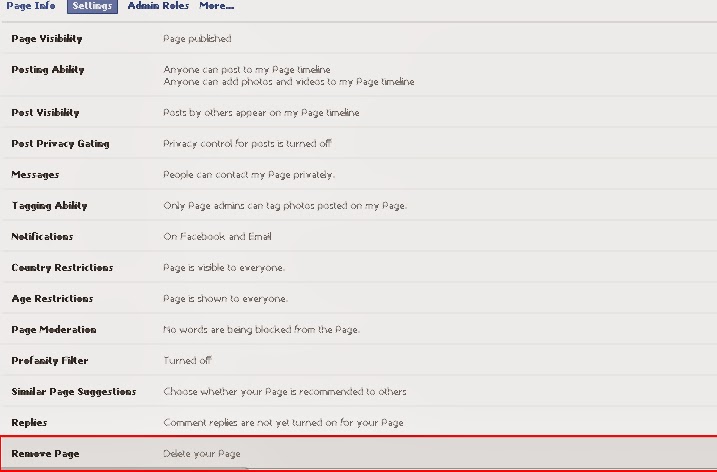
2 Once you are on the Settings page, scroll down and then click on the Remove Page option.

Remove Facebook Page option
3 A confirmation message will appear and says that you have 14 days to restore your Facebook page again before it will be deleted permanently, to continue click on Delete "your Facebook page name", and then click on Delete Page. If you want your Facebook page to be unpublished within the 14 days check on the "Unpublish this page" option; at the down corner of the pop up message, so that no one is going to be able to see your Facebook page in the 14 days.

Final confirmation message for Facebook page removal.

NOTE: If you have a Facebook page which is new or have less than 25 likes, the delete process won't take 14 days, but it will be deleted once you confirm the message and you'll never be able to get it back.

That's all, I hope you find this article helpful for you.

Sunday, September 8, 2013

How to change your Facebook log in email address


If you are not satisfied about using your current Facebook email address every time you log in to Facebook and want to change it for another email address, this guide will show you how to change your Facebook account primary email in 5 simple steps:

1 To change your Facebook log in email, go first to the Facebook homepage and log in with your registered account email and password.


2 Go to your Facebook Account Settings, on the first page of General Account Settings click on third option which is Email just under the Username in order to edit your Facebook primary email address.

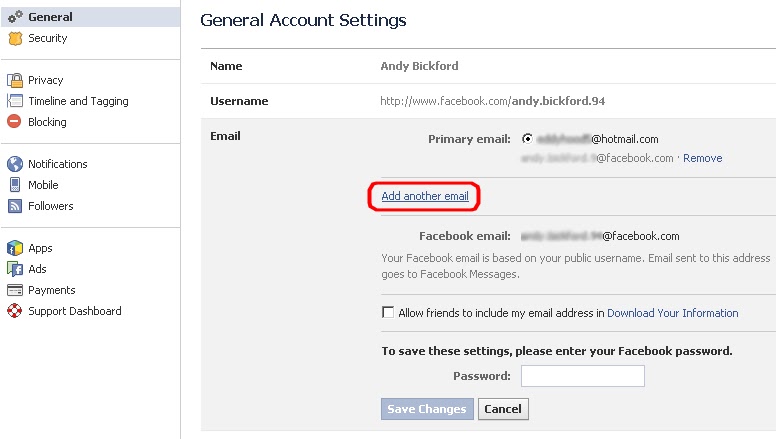
3 Now just under your Primary email used for log in, you'll find the option of add another email click on it, then add your new email address; the email that you want to use as your new Facebook log in email.

Add another email address to your Facebook account.

4 To save the new settings type your Facebook password and click on Save Changes, now a confirmation email will be sent to your new email address in order to confirm it.

Saving your new Facebook email address.

5 Finally, and once you've confirmed your new email address, go back to the Email option on the Facebook Account Settings page and check on your new email address to use it as your new log in email, type your password again and click on Save Changes.

Change your Facebook account primary email address.

Now you did change your Facebook primary email address to a new one that you'll use to log in with your Facebook account in the next times. You can change your log in Facebook email address as many times as you want following the same steps above.

That's all, I hope you find this article helpful for you.

Sunday, September 1, 2013

How to download videos from Facebook free and easy

As you know Facebook videos can not be downloaded directly via Facebook to your computer or mobile as Facebook doesn't provide any option to do that, but today I'm going to show you how to download Facebook videos without using any videos download software, free and online from any web browser Google chrome, Internet explorer or Mozilla Firefox.. whether you are using Mac, PC or even phone device. DownVids.net helps you download and save any Facebook video you want to your local disk in MP4 and format and even HD video quality in a very easy way, to do that just follow the next 4 steps below:

1 The step number one is to go on Facebook and find the video which you want to download, once you find the video, Click right on it and select copy link address, or just open the video's link in a new tab and then copy its URL.

Copy Facebook video link address.

2 The second step is to go to www.downvids.net, where you can download videos online from Youtube or Facebook and save it to your local disk for free without having to log in or register. once you're on DownloadVids homepage paste the video's link address in the empty white bar then Click on Download.

3 Once you clicked on to click on Download this Video button, the download link will show up in a new tab on your web browser.

Click Download this video button.

4 Finally, open the new video tab, Right Click and select Save as, then choose a download file name and location to the video and then save it.

Save the Facebook video on your local disk. 

NOTE: You can download Facebook videos in HD from the same website, to do that select Download HD quality (only Facebook videos), just under the video download bar.

Congratulations now you learned how to download Facebook videos, that's all, I hope you find this article helpful for you !

Sunday, August 25, 2013

How to get your Facebook account back after being disabled


There are several reasons where Facebook could have disabled your account for and blocked you to gain access to it again, with or without a warning some of the reasons are logic whereas some others are made by mistake. However if you are trying to log in into your Facebook account and it says: Your Facebook account has been disabled, Here's the two questions that come into your mind, why, and how to get my Facebook account back?, this means that you must have violated Facebook statement of rights and responsibilities in a way or in another.

Common reasons why would Facebook disable your account:


Facebook Fake Name: Your Facebook account can easily get disabled because of a fake Facebook name or when you try to use a celebrity name or just include abnormal words or characters in your Facebook name.

Adding too many Facebook friends: while the maximum limit for adding friends is 5000 friends, you may get blocked for adding too many friends.

Joining a large number of Facebook groups: the maximum limit for joining Facebook groups is 200 groups per account. but your account may still get disabled for joining more than 100 groups.

Writing offensive comments or status: If you have written offensive posts on your wall or someone's else wall or in a Facebook page, you may get easily reported to Facebook.

Spamming: If you add too many duplicate links or promotional content in Facebook posts or messages within one session you're account is definitely going to be disabled.

Underage: If you're under 13 years old, you are not allowed to have a Facebook account.

Security Disable: Your account may get disabled for security reasons, as it may be someone is trying to hack your account or steal your identity, but in that case you will get an access to it just by passing the account verification process.

How to get a disabled Facebook account back:

To enable your Facebook disabled account again, you need to contact the Facebook team by submitting an appeal to them, you need to fill out this form My Personal Account was Disable without having to log in to your Facebook account, first enter your disabled account email address, then your contact email address where Facebook can send you a reply, and your account name and date of birth as well, you can leave more details in the additional info box if you think that it's important. when you finish click on the blue button Send.


You should get a response from the Facebook team in less than a week, If you didn't receive any response try to contact them again.

How to protect your Facebook account from getting disabled:

However to avoid this happen again, make sure you read the Facebook statement of rights and responsibilities and not violate any of them as a Facebook user.

When thinking about changing your Facebook account name, keep away from using abnormal characters or symbols.

Don't think about spamming Facebook using your personal account, that's something Facebook would easily find out and take action against it.

Don't send more than two Facebook friend requests per week or learn How to find and cancel all friends requests on Facebook at once. and keep away from adding people that you don't know outside Facebook as it may cause you other problems.

That's all, I hope you find this article helpful for you.